
Winter holidays are a time that can be devoted not only to the family, but also to your favorite hobby. And you have not found something to your liking, try to knit, for example, mittens. This is not only a fascinating activity, but also a way to make a great gift to someone from the family.
Knitting pattern
For work, we need a woolen thread (70 g), 5 stocking knitting needles No. 3.
Knitting density =1,7 loops of 1 cm. Next, you need to measure the girth of the brush, but we will knit for a hand whose girth of the brush is 20 cm.
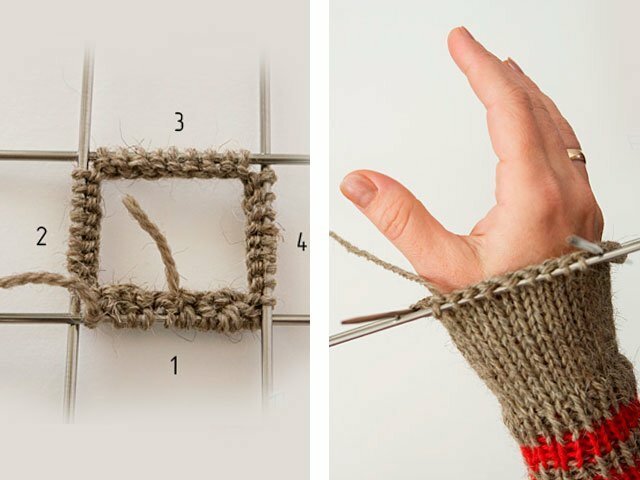
The product is knitted from top to bottom on five knitting needles, as a result of which it will turn out seamlessly. Loop calculation:20 x 1,7 = 34 loops. We distribute 34 loops on 4 knitting needles. I propose to round and dial 36 loops, so we get 9 each.
To facilitate the explanation, we give each spoke a serial number. Closing the circle, we knit four stitches of the 1st knitting needle together with the end of the yarn remaining on the 4th knitting needle from the set of loops so that the circle closes around the edge more tightly.
Start with right part. We will assume that on the 1st and 2nd knitting needles there are loops of the lower part of the mittens, and on the 3rd and 4th - the upper ones. We start the work with an elastic band that we knit 1 × 1 (1 front, 1 wrong side). The height of the elastic or cuff is 7 cm.
Next, we go on to knitting the main part of the mittens: we knit in a circle with facial loops to the base of the thumb 5 - 7 cm, depending on size.
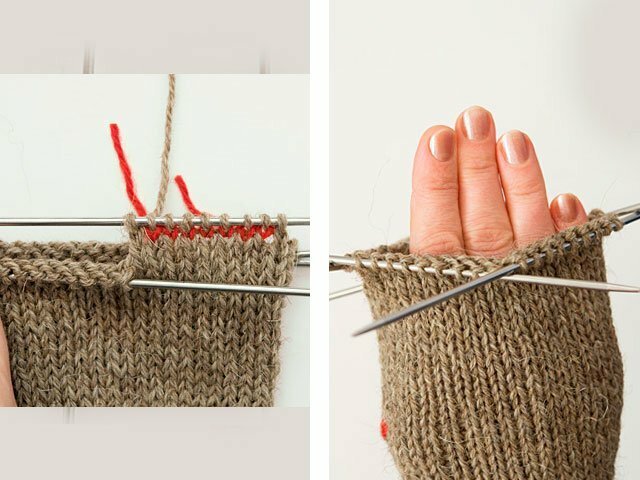
The thumb will be knitted on the 1st knitting needle, for the left - on the 2nd. To do this, we knit the first loop with the first color of thread in the first needle. All other loops, except the last one, are knitted with colored thread. Then we return the loops connected by a colored thread to the 1st knitting needle and once again we knit the main thread. We get a colored stroke. This will be the hole for the thumb in the future. Next, just knit to the little finger (about 8 cm).
Then proceed to the reduction of loops on the toe of the mittens. On the 1st and 3rd knitting needles at the beginning, we knit the first two loops together in the front in the second way (behind the back walls), after first turning the 1st loop. On the 2nd and 4th knitting needles we knit two loops together at the end of the knitting needle face first way (for the front walls). So, we decrease the loops through the circle until half the number of loops appears on each spoke (in our case, when the number of loops on each spoke is odd, we reduce the smaller part - 4 loops through the circle), then we reduce the loops in each circle (5 loops). At the same time, on the 1st and 3rd knitting needles, in those rows where the loops do not decrease the first loops, we also invert and knit in the first way. When there are 2 loops on each spoke, we tighten the loops and fix on the wrong side.
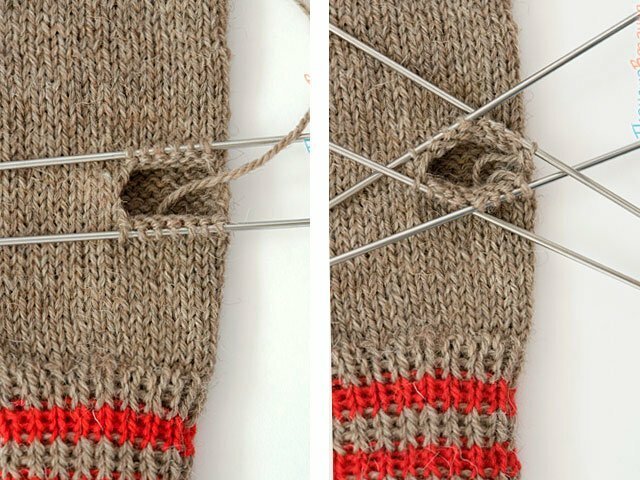
Now proceed to tying the thumb. To do this, carefully pull the colored thread out of the thumb hole. Then we introduce two knitting needles into the loops, we get 7 loops on the lower needle, on the top 6. We start knitting a finger, distributing the loops into 4 knitting needles: on the first 4 loops, on the second 3 and pull one loop from the side edge of the hole, on the 3rd and the 4th spoke will also have 4 loops (3 + 1 from the side edge of the hole). To make it more convenient, the end of the working thread can be lowered into the hole (on the wrong side of the product).
We continue to knit the finger in a circle to the middle of the nail, and then we begin to lower the loops in the same way as when knitting the toe of the mittens: on the 1st and 3rd knitting needles at the beginning, on the 2nd and 4th knitting needles at the end, but decreasing do in each row. When the first loop remains on each spoke, we tighten the loops and fasten them on the wrong side.
Left mitt It fits in the same way as the right one, but in a mirror image: we knit the hole for the finger on the second needle.
Remember that there is nothing better than a gift made by your own, especially so warm.


