
Crocheted vegetables and fruits are perfect for the interior of any apartment. They will not only be a great decoration, but can also serve as beautiful toys for your children. Below are simple crochet patterns for fruits and vegetables for beginners. You will be able to entertain yourself and your children by following various knitting patterns for beautiful vegetables, fruits, or even berries.
Knitted vegetables and fruits crochet knitting pattern.
In order to tie fruits and vegetables we will need: a hook, threads, filling material (synthetic winterizer, cotton wool), a gypsy big needle and scissors. First of all, we will begin our master class with the implementation of the scheme of a knitted fruit - an apple.
Fruit knitting master class
PRODUCT 1
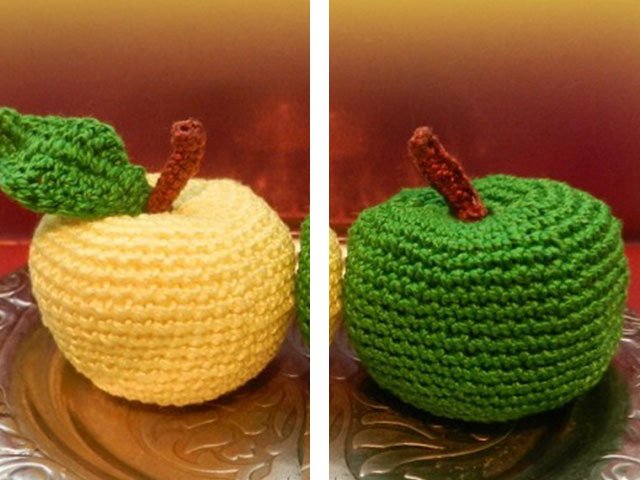
Below is a diagram of a knitted fruit - an apple. Before starting to work with the fruit scheme, we will familiarize ourselves with the nomenclature of our description:
- air loop - vp,
- single crochet column - senior researcher,
- double crochet column - st.s.s.
- connecting column - s.s.
At the end of each row, the total number of stitches is shown in parentheses, for example (20). For knitted fruit, we will use threads of red, green or yellow for the apple itself, cinnamon for the twig, and green for the leaves.
To get started, take a yellow thread and wrap around a finger, make a small ring, fix it next to 4 air loops. Our fruit will consist of 26 rows.
Description of the scheme for knitted fruit in rows:
1st row - we knit in a ring of 6 columns of loops without a crochet (6);
2nd p. - double each loop, knitting 2 columns of single crochet into it, so we get 12 loops (12);
3rd r. - in each second loop we knit 2 st.s.b.n., that is, we make an increase through 1 loop, a total of 18 loops (18);
4th p. - add a loop to every third loop (24);
5th p. - add a new loop to every fourth loop (30);
6th p. - we crochet in a circle;
7th p. - add a loop to each 5 loop (36);
8th p. - we crochet in a circle;
9th p. - add a loop to each 6 loop (42);
10th p. - we crochet without adding in a circle;
11th p. - we crochet without adding in a circle;
12th p. - we crochet without adding in a circle;
13th p. - we crochet without adding in a circle;
14th p. - we crochet without adding in a circle;
15th p. - add a loop to every seventh loop (48);
16th p. - we crochet in a circle;
17th p. - we knit 7 and 8 loops together, as a result, the decrease occurs through 6 loops (42);
18th p. - we crochet in a circle;
19th p. - we reduce each 6 loop (36);
20th p. - we crochet in a circle;
21st p. - we reduce each 5 loop (30);
22nd p. - we crochet in a circle;
23rd p. - we reduce every 4 loops (24);
After the 23rd row, we fill our fruit with cotton wool or synthetic winterizer (you can also use buckwheat, beans or peas).
24th p. - we crochet in a circle;
25th p. - remove each 3 loop (18);
26th p. - remove each 2 loop (12);
Next, repeat the steps until we have only 5 loops left, after which we leave about 20 cm of thread, and cut it from the ball.
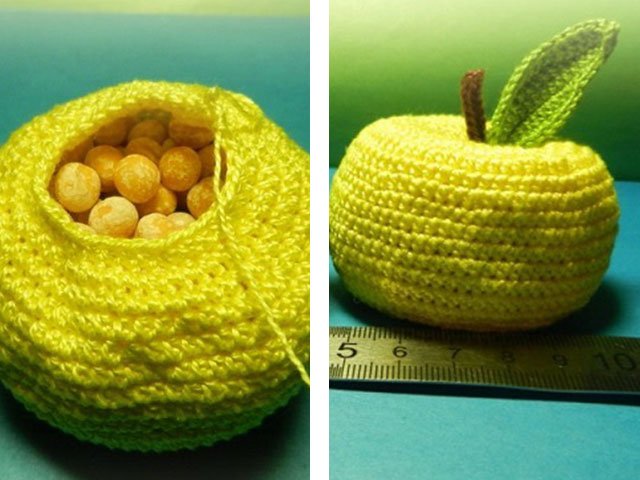
We insert the tip of the thread into the needle and carefully tighten our fruit.We pass the needle with the thread to the edge of knitting, and stretch the thread through the entire surface. Return the thread to the center of the apple. In order to give the fruit a natural shape, we perform several more similar actions. After we cut off the extra length of the thread, and hide a small residue inside the apple.
Now take a brown thread to create a twig. We collect 12 air loops (vp), then draw a hook to 3 loops and connect all the loops with a double crochet. Sew the finished twig to the apple.
PRODUCT 2

Now consider another tasty pattern - knitting strawberries! To do this, we need threads of red, yellow and green.
First, we will begin to knit the berry itself, for this we take a hook and threads of red color. We act according to the scheme:
We make a ring and knit 2 VP (air loops).
1st row: starting from 2 loops from the hook we knit 6 b.s. (6);
2nd p.: For each loop we make 6 increases (12);
3rd p.: 1 p., 3 sbn * 3 times (15);
4th p.: 1 p., 4 s.s.b. * 3 times (18);
5th p.: 1 p., 5 s.s.b. * 3 times (21);
6th p.: 21 ppb (21);
7th p.: 1 p., 6 s.b.s. * 3 times (24);
8th p.: 24 ppb (24);
9th p.: 1 p., 7 s.s.b. * 3 times (27);
10th p.: 27 sbn (27);
11th p.: 1 p., 8 sb * 3 times (30);
12, 13, 14th p.: 30 ppb (30);
15th p.: 1 p., 4 s.s.b. * 6 times (36);
16, 17th p.: 36 ppb (36);
18th p.: 1 p., 11 sb * 3 times (39);
19, 20, 21, 22nd rows: 39 SBB (39);
23rd p.: 1 in., 11 s.b.s. * 3 times (36);
24th p.: 1 y., 4 s.b.s. * 6 times (30);
25th p.: 1 c., 3 s.b.s. * 6 times (24);
We begin to fill the strawberries with filler!
26th p.: 1 c., 2 s.b.s. * 6 times (18);
27th p.: 1 y., 1 s.b.s. * 6 times (12);
28th p.: 6 (6);
The remaining loops are tightened and tied. Now we knit a leaf. We take a green thread and a hook, make a sliding knot and add 2 air loops.
Scheme:
1st row: starting from 2 vp we knit 5 sbn total we should get 5 loops (5);
2nd, 3rd, 4th, 5th rows: 5th SBB (5);
6th p.: 5 p. (10);
7th p.: 1 p., 1 s.s.b. * 5 times (15);
Next, we continue to knit leaves according to a similar pattern, add 5 or 8 air loops to the 2 air loop and then follow the pattern.
Sew the seeds with an ordinary yellow thread. We connect all the details of the berry together. Strawberry is ready!
PRODUCT 3
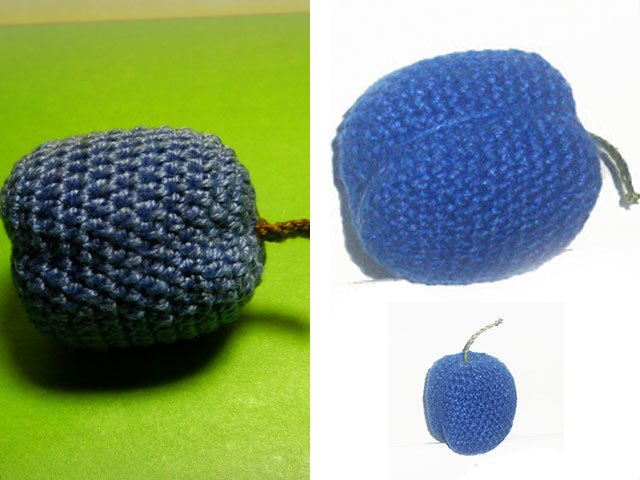
Now we will bind another fruit - plum.
Consider the laughter of knitting the main part of the fruit:
1st row: in the ring of 6 senior sc (6);
2nd p. : 6 p. (12);
3rd r. : 1 st.s.b. + p. * 6 times (18);
4th p. : 2 senior bc, n. * 6 times (24);
5th p. : 3 senior medical science, item * 6 times (30);
6th p. : 4 senior bc, n. * 6 times (36);
7, 6th rows: 36 st.
17th p. : 4 senior sc. * 6 (30);
18th p. : 3 senior sc. * 6 (24);
19th p. : 2 senior sc. * 6 (18);
20th p. : 1 senior sc. * 6 (12)
We stuff the plum with filler.
21st row: 6 y. (6).
Leave a little thread, thread it into the needle. We pierce the needle through the whole fruit. Pull the thread and fasten. The plum must find its natural form. From brown threads we knit 5-8 air loops. We get the finished stick for plum, sew it to the fruit.
How to crochet vegetables - lessons step by step
PRODUCT 4
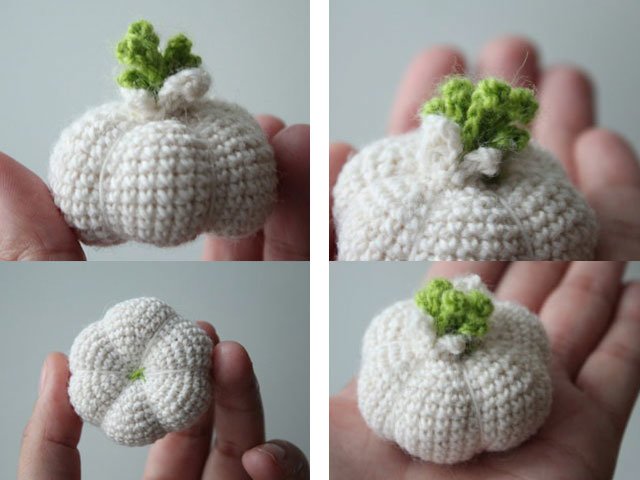
Now we will consider a knitting pattern for vegetables. We will knit garlic, an easy scheme for beginners.
The nomenclature of our description remains the same:
- air loop - vp,
- single crochet column - senior researcher,
- with a crochet - st.s.s.
- column - s.s.,
- increase - p.,
- decrease - at.
At the end of each row, the total number of stitches is shown in parentheses, for example (18). For knitted garlic, we will use threads of white and green.
We knit the main part of garlic:
1st row: wrap a small ring on the finger, and collect 6 loops (6);
2nd p.: We add one more loop to each loop, so we get 12 (12);
3rd r.: We collect a single crochet with the addition of a loop 6 times, (18);
4th p.: We collect 2 single crochet with the addition of a loop also 6 times (24);
5th p.: 3 b.s. + 1 p. * 6 times (30);
6th p.: 4 b.s. + 1 p. * 6 times (36);
7th p.: 5 sb + 1 p. * 6 times (42);
8th and 12th rows: we recruit 42 b.s. (42);
13th p.: 12 pb.s. + 1 decrease * 3 times (39)
14th p.: 11 p.s. + 1 y * 3 times (36)
15th p.: 10 b.s. + 1 y * 3 times (33);
16th p.: 9 pb.s. + 1 y * 3 times (30);
17th p.: 3 pb.s. + 1 y * 6 times (24);
18th p.: 2 pb.s. + 1 y * 6 times (18);
19th p.: 1 pb.s. + 1 y * 6 times (12);
Stuff the garlic with the filler. Next, take a thread and leave 15 centimeters, put a thread in a needle and shape our garlic, knitting a thread to the core of our root crop.
We knit green leaves and fasten separately. In order to tie the leaves, we collect 6 green air stitches, then we knit the chain in the opposite direction with single crochet, starting with 2 loops from the hook. The resulting petal is connected with 1 connecting column in the same loop with which we started knitting (with 2 loops). We connect the finished petal with garlic with a thread with a needle. The garlic is ready!
PRODUCT 5
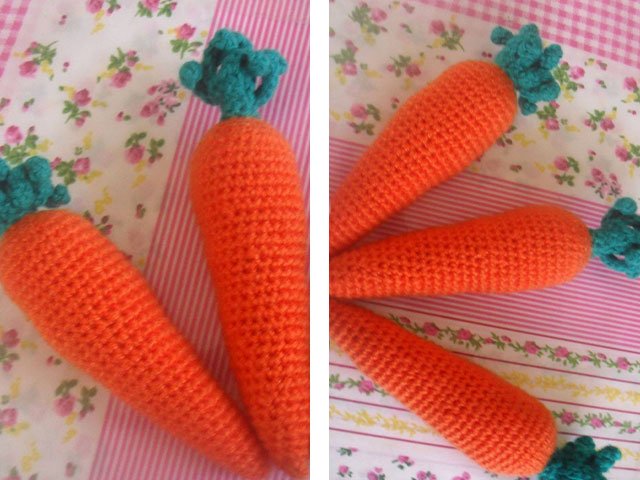
Now we will tie the carrots. To do this, prepare in advance the threads of orange and green. We start with the main important part, and as usual we make a ring of 6 air loops.
Further according to the scheme:
1st row: starting from the second loop we make 6 additions (the increase is 2 st. Bn of two loops knitted together) (12);
2nd p.: 1 single crochet column with addition 6 times (18);
3, 4, 5, 6th p.: 18 single crochet (18);
7th p.: 4 st. * 3 times (15);
8, 9th p.: 15 senior doctor of biological sciences (15);
10th p.: 3 senior * 3 times (12);
11, 12th rows: 12 senior b.n. (12);
13th p.: 2 st. * 3 times (9);
14, 15th p.: 9 senior bb (9);
We fill the carrot with filler;
16th p.: 1 senior * 3 times (6);
17 - 18th p.: 6 senior doctor of biological sciences (6);
19th p.: 3 (3);
20th p.: From each loop of the previous row, pull 1 loop and knit everything together. Cut the thread, hide the extra piece in a carrot.
Now let's take a look at the leaves. We make 10 air loops, starting from 2 vp we knit a number of st.B.s. (9); so we repeat the steps until we get a leaf, do the next leaf in the same way, we knit another 10 bp from the 2nd air loop of the first leaf, then we knit a number of st.BN (9), the following leaves can be made at least 8 vp
We attach the finished tops to the carrots. Carrot is ready!
PRODUCT 6

Now consider a more complex knitting pattern.
We knit cabbage, but before we start knitting, let's familiarize ourselves with the notation:
- air loop - vp,
- single crochet column - senior researcher,
- double crochet column - st.s.s.
- connecting column - ss,
- increase - n., decrease - y,
- lifting loop - p.p.,
- half-column - p.
- double crochet - Ph.D.
For cabbage we need 2 green colors, one is lighter for a head of cabbage.
We start our knitting with a head of cabbage, make a ring, wind a thread on a finger, and begin to knit the first st.B.s.
Next, look at the diagram:
1st p.: We knit 6 stb.bn (6);
We pull our knitting into a ringlet, pull the remaining tail from the thread
2nd p.: We knit 2 st.B.s. in each loop (12);
3 to the 20th p.: We knit st. Bn, in each row we knit 6 st. Bn (120);
21 to 41st p.: We knit st.B.s. (120);
42 to the 53rd p.: We knit st.B.s.
We fill our kochak with filler and tighten the thread. The head of cabbage is ready, go to the leaves.
We are guided by the scheme:
1st p.: We recruit 18 vp + 2 vp (20);
2nd p.: We knit st.s.s. (27);
3rd p.: Continue to knit st.s.s. (40);
4th p.: Senior scientist (40);
5th p.: Senior sc * 2 times (60);
6, 16th p.: We knit st.s.s. (60);
17th row: we knit st.s.s. + d.s. (40);
18, 19th p.: We knit st.s.s. (40);
20th p.: We knit st.s.s. + d.s. (27);
21st p.: We knit st.s.s. (27);
22nd p.: We knit st.s.s. + d.s. (18);
23rd p.: We knit Dr.Sc. (9);
24th p.: We knit d.st.n (5);
The first leaf is ready! We knit 5 more leaves in a similar pattern. Then we fix the leaves to the cabbage. The cabbage is ready!
Crochet vegetables and fruits video
Crochet is an educational activity not only for children, but also for adults. To get started, let's understand what amigurumi is. Amigurumi is the Japanese art of knitting little animals or creatures with human qualities. In this video we will look at how to make a slice of watermelon using the Amigurumi technique.
PRODUCT 7
So, you can watch the video for a free master class on how to knit a watermelon from a hook, armed with all the necessary materials (threads, hook, scissors, needle)
PRODUCT 8
The following videos will tell us how to crochet a lemon, which can perfectly complement the interior of any kitchen. Also, this lemon can become your child’s favorite toy, you just need to sew eyes and a mouth to our lemon.
PRODUCT 9
In this video we will learn how to crochet a developmental toy - corn. This corn can be used for educational games with a child, because it trains the imagination and develops fine motor skills. Knitted corn can serve as an excellent gift for children and adults in a set with other vegetables and fruits.
PRODUCT 10
Next, consider another video how to knit a pear. On the Internet you can find many other different free videos and applications, such as crocheting items such as a pot holder, washcloth, stand, pineapple, mushroom, flower, as well as other kitchen decorations.


