We all remember the prickly hats that were still connected by our grandmothers, from whom the forehead was very scratched. But the most important thing is that they were knitted with love to us, we felt warm in them in the cold season. We offer you to learn how to knit the same warm and cozy things, but from softer and more delicate yarn.
Thanks to detailed master classes and video tutorials, we can today connect such products ourselves. And we'll start by crocheting mittens. Of course, you can also knit them with knitting needles, but with a hook things will go faster.
Mittens crochet - patterns and description of knitting mittens
It is always more pleasant to wear those things that were made by yourself. Or receive such things as a gift. Especially if it is - mittens. They will be warm and cozy in winter, they warm their hands perfectly, and how many emotions can be obtained when creating such an accessory! Today we offer you to knit beautiful mittens made of wool yarn for salvation from the winter cold.
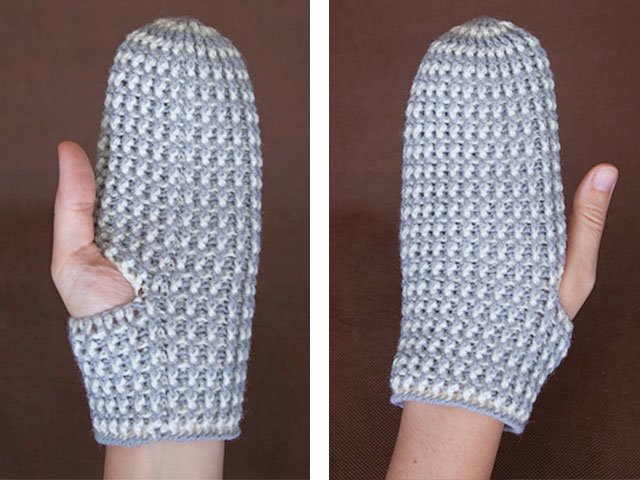
Crochet mittens - a simple master class for beginners
We use two colors: white and Gray, hook 3.5 millimeters.
Designations:
- V.P. – air loop
- ST – column
- S.S.N. – double crochet
- S.B.N. – single crochet
- R.L.S.S.N. – embossed double crochet
- R.I.S.S.N. – embossed inside crochet

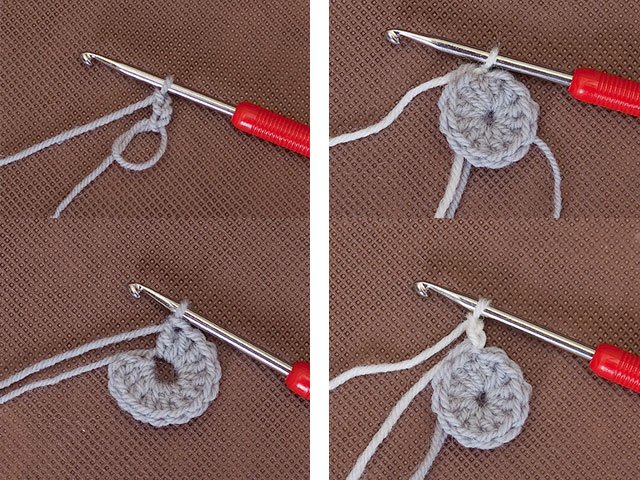
Gray color make a ring from 1 P.
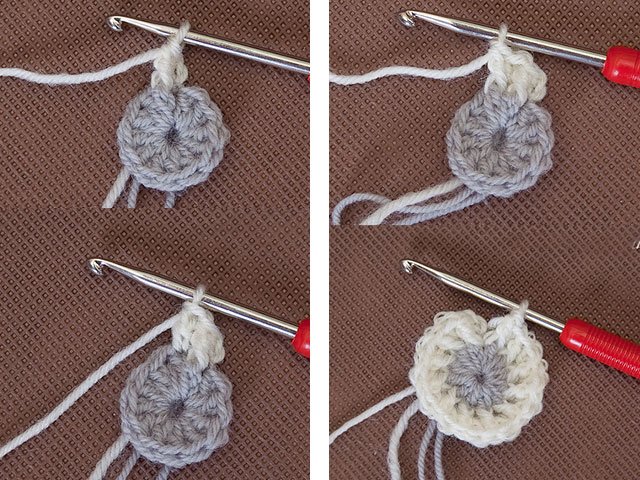
- 1 R .: 3 V.P. + 11 S.S.N. in the ring, close with S.S. white shade (we introduce a hook in 3 V.P.).
- 2 R .: 2 V.P., in the same P.R.L.S.S.N. (embossed facial column with a yarn), (S.S.N. in S.S.N. of the previous R. and R.L.S.S.N., under the same S.S.N. of the previous R.) = to the end of R., S.S. grayed out.
- 3 R .: 2 V.P., repeat all the actions from 2 R. Close with white.
- 4 R .: 2 V.P., gum: R.L.S.S.N. and R.I.S.S.N., i.e. in the next P.R.L.S.S.N., in the next. P. - R.I.S.S.N., gray S.S.
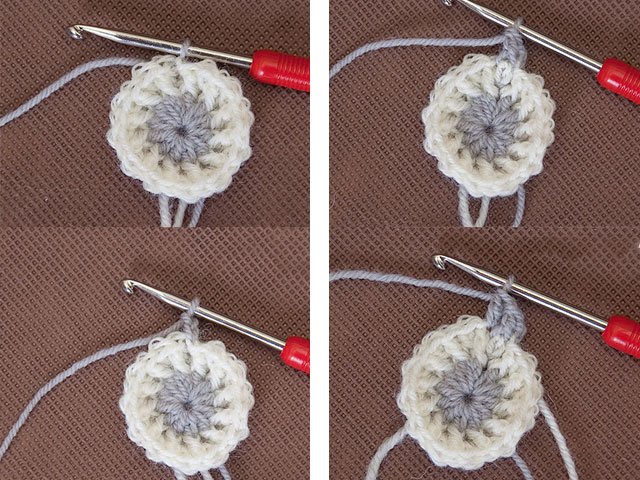
The rest of R. - without P.R. as 4 R., alternating R.S.S.N., 2 V.P., R.L.S.S.N., R.L.S.S.N., R.I.S.N .N., S.S. white color. 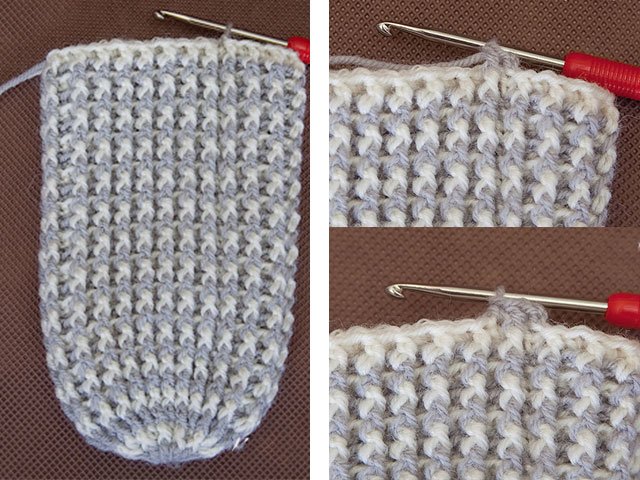
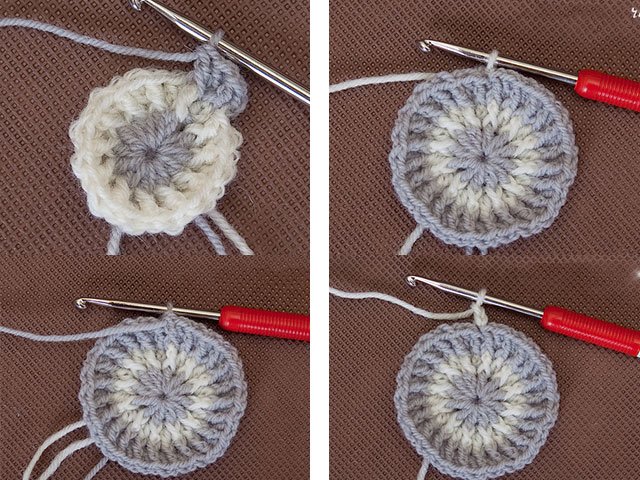
 We continue to knit to the length of the thumb. Below we will present a diagram in which we will tie the hole for the thumb.
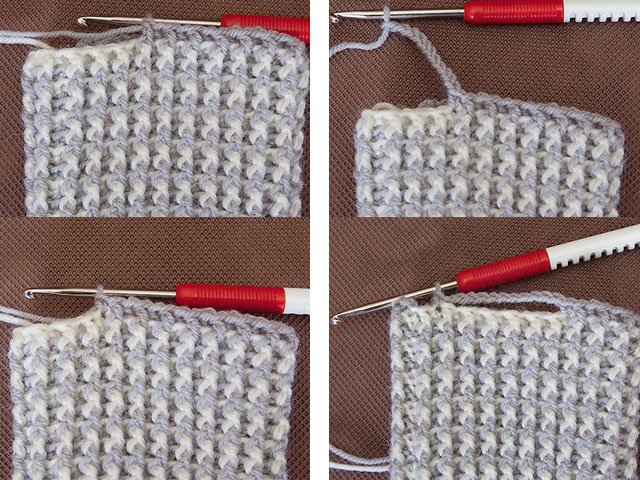
 2 V.P., R.L.S.S.N., S.B.N., 11 V.P., 12 ST. - S.B.N., further down the picture, S.S.
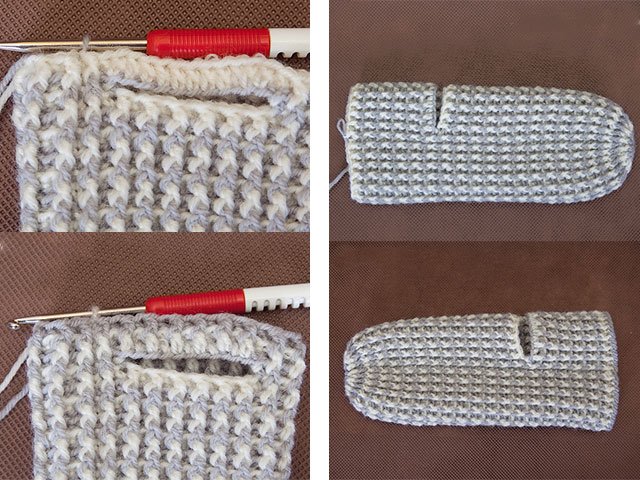
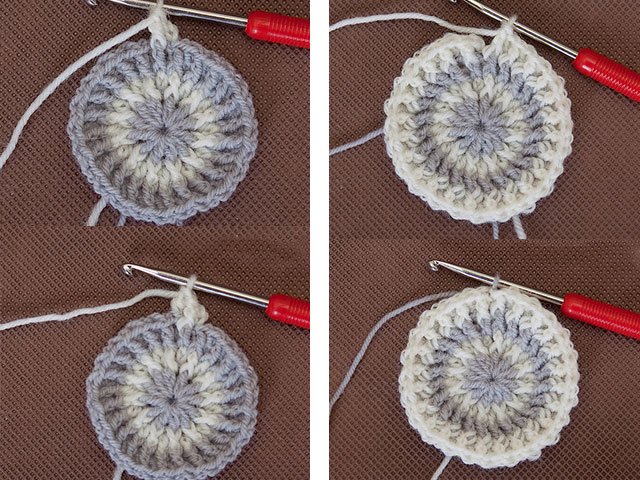
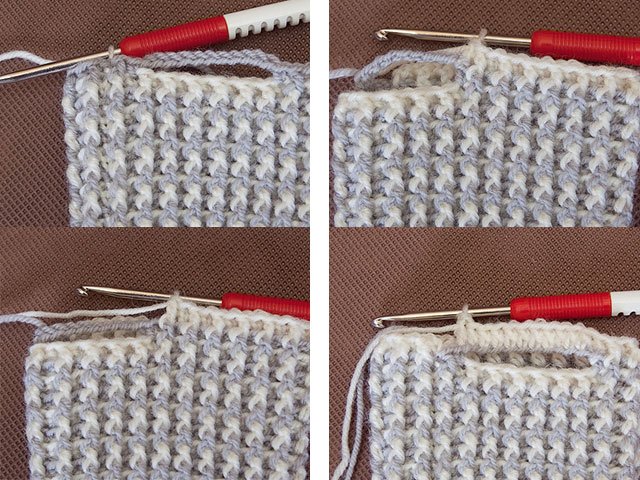
 Keep knitting "body" mittens with a white shade: alternate R.ST. according to the drawing, in S. B.N. before R. - R.I.S. In S. B.N. before R. - R.I.S. S.N., R.L. S.S.N., S.S.
 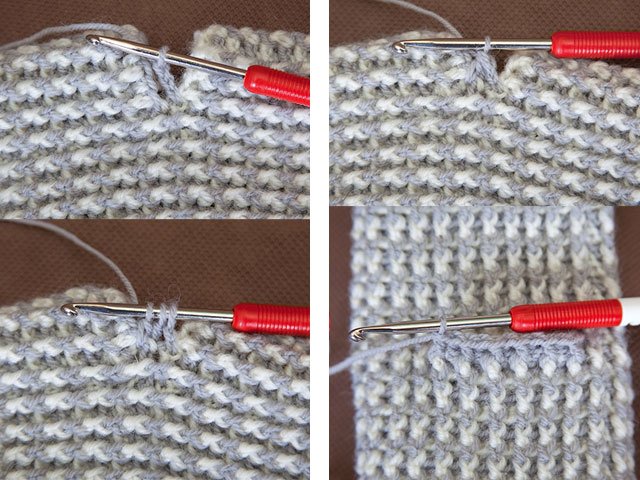 We continue work as 4 R., alternate R.L. and R.I.S.S.N. We make the desired length of the mittens. The most recent R. - the pattern "Crustal step."
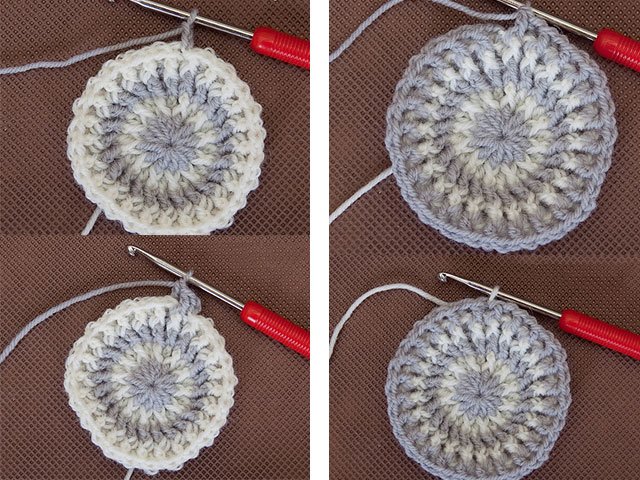
To beautifully tie the “finger”: gray shade 2 V.P., 2 untied S.S.N. (We don’t knit P. on the hook), carefully enter the hook, in order to avoid holes. 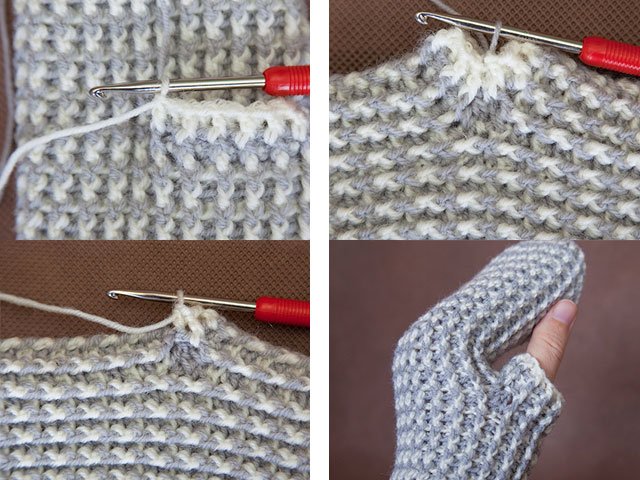
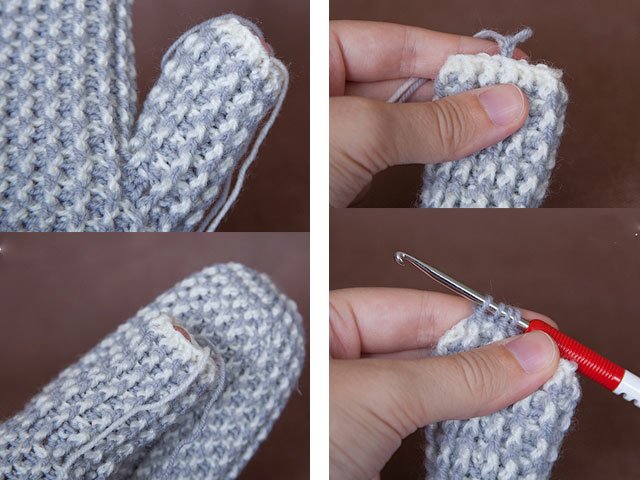 3 P. together, 11 R.ST., change the thread to white - 11 R.ST., 2 V.P., R.ST. - according to the drawing. All trace. R. - similar to 4 R.
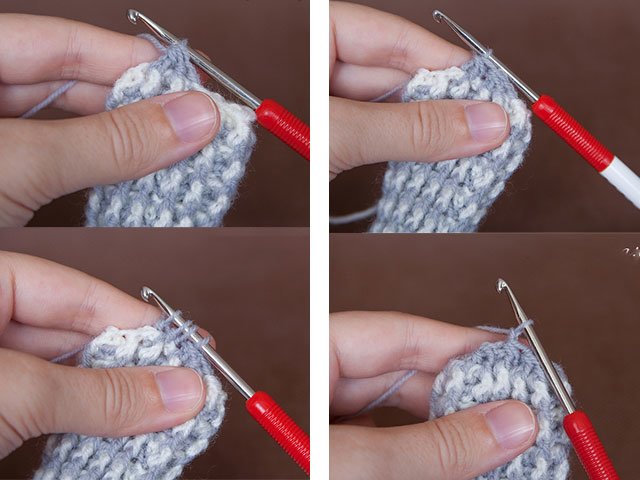
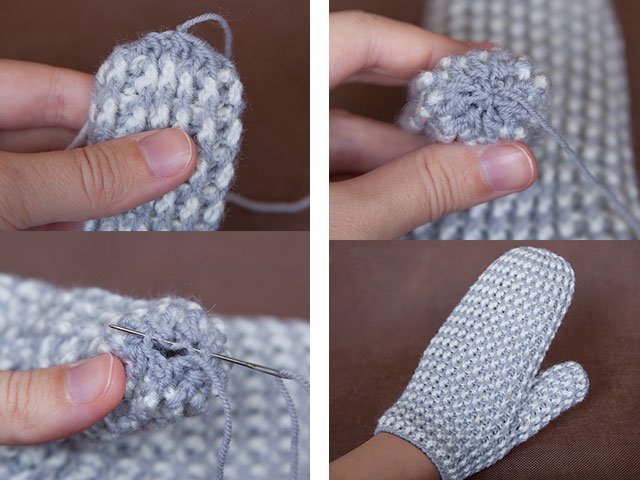 We knit to the desired length, the last R. with WB: 2 V.P., 3 untied R.ST., 2 P. which do not knit. The remaining 4 P. - one P. 3 unbound R.ST. we knit, S.S. Finish the canvas. Sew with a needle.Our mitt is ready!
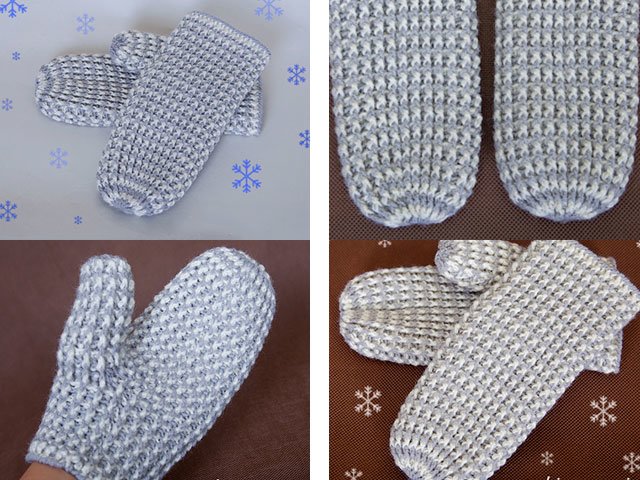
Children's mittens crochet patterns and description for 3 years
Beautiful mittens with cats from wool and acrylic yarn (50/50). We also took some thread for the antennae, nose and a pair of beads for the eyes.
Work description:
34 V.P. into the ring. From 1 to 13 P .: S.B.N. straight. 14 R.: 14 S. B.N., make a hole for the finger: 7 V.P., skip 7 P., continue knitting. From 15 to 25 P .: S.B.N. 26 and 27 R .: U.B. 2 P. from 28 to 34 R .: U. B. by 2 P., all P. who are left - pull together. Further fasten the thread from the hole for the finger and knit S.B.N. to the middle of the nail plate. Pull all P. together. Tie the lower edge of the future mittens 2 R.S.B.N. white tint.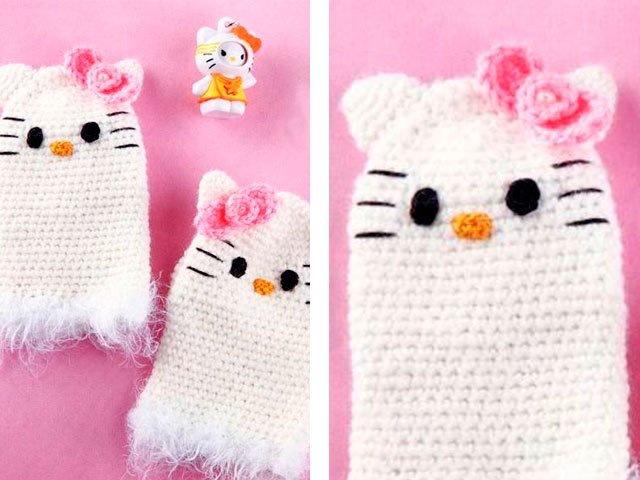 Making the ears: 18 V.P. into the ring, 5 R. with uniform WB We knit before acquiring the shape of a triangle. For a bow 15 V.P. pink color. 2 R. with P.R. 6 S.B.N. at every turn. 3 V.P. in the ring = 10 S.B.N. Sew a circle, which is smaller in diameter, to a larger one, you can add a bead to the middle. To the glove has acquired a finished look, you need to embroider the muzzle. Your child will be delighted !!!!
We knit for children - mittens for the child
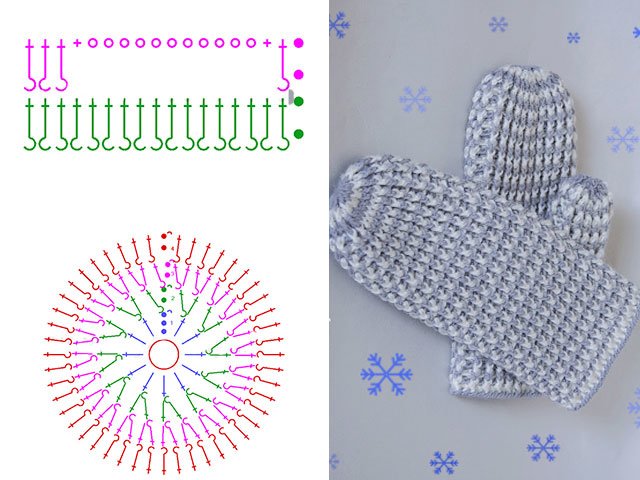
Woolen mittens from white and lilac colors are perfect for your child. If you replace lilac with blue, then you get excellent crocheted mittens for a boy. Below is a diagram in the photo. If it’s hard for you to read it, then follow our description.
- 1 R .: 23 V.P.
- 2 R .: 3 V.P.P., S.S.N., in the last. P. 7 S.S.N., S.S.N. to the end of R.
- 3 R .: V.P.P., S.B.N. 2 S.B.N. * 6 in ST. previous R.
- 4 R .: as 2 R., for rounding in ST., close to the apex, 2 S.S.N. * 6.
- 5 R .: as 3 R. 3 S.B.N. * 6 for rounding in ST. before R. through 1 ST.
- 6 R .: like 4 R.
- 7 R .: like 5.Link two such detailsto knit them together afterwards. Next, go to part c with a finger: 1 R.: 2 V.P., 2 S.B.N. 2 R .: turning over to knit 5 S.B.N. 3 R.: L. side - 7 S.B.N. 4 R .: 9 S.B.N., 5 R .: 12 S.B.N., join the mittens. 6 R .: 12 S.B.N. 7 R.: 15 S.B.N. into the ring. 8 - 12 P.: 15 S.B.N. 13 R .: 12 S.B.N. 14 R.: 6 S. B.N., all P. who are left - to pull off.
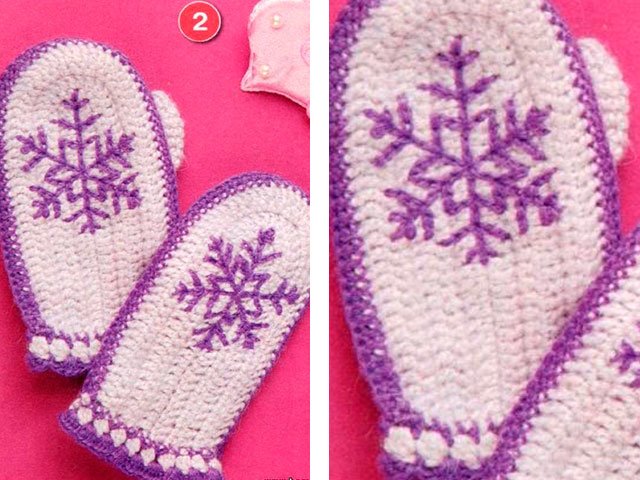
We collect: tie the two halves around the perimeter with a lilac color, tie the finger. Gauntlet Bottom: S.B.N., by C / X 2. Next by C / X 3. You can embroider a beautiful snowflake - the child will be delighted with this pattern. A detailed master class will quickly teach you this technique, which you will soon master in perfection. Thus, you can knit mittens for girls and for boys.
How to crochet mittens for beginners step by step
Warm knitted mittens for babies, for newborns, for beginners and for experienced craftswomen you will find only in our rubric about knitting. It is very simple and easy to learn how to knit, relying on understandable patterns, a detailed description and video tutorials.
Crochet mittens for beginners
The most difficult thing in this matter is to understand the correct sequence of actions that need to be performed. It will turn out much better if you take a thicker yarn for the first time. We chose 120 m / 100 grams, the corresponding hook is at number 6.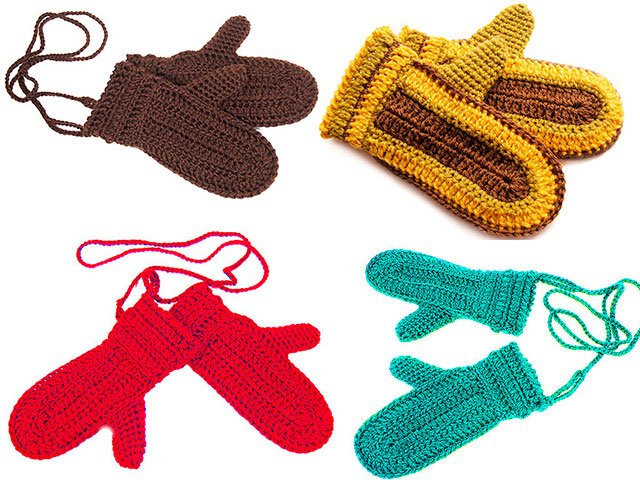
So let's get started:
We recruit a chain of V.P., which in length should correspond to the distance from the top of the longest phalanx of the fingers to the wrist. This chain is tied S.S.N. (for a round corner + 5 P. on top). 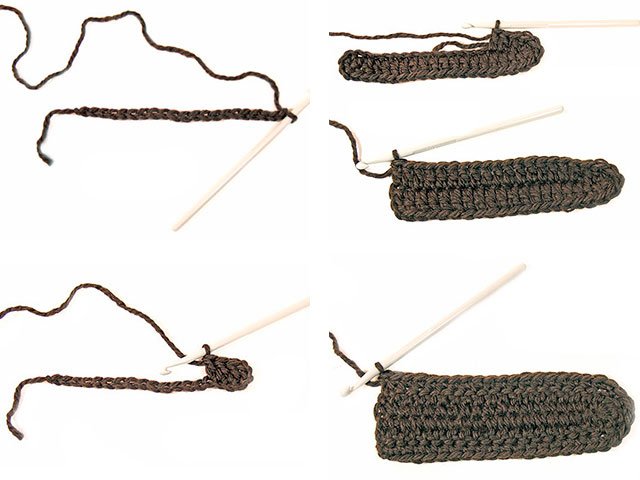 Turn the canvas and continue with S.B.N. Then again turn over and S.S.N. Here for the round corner 2 S.T. in 1 P * 3. Better done through 11 S.T. So our half of the mittens is ready. We need two of these. We connect the resulting parts together and the strapping of S.B.N. Important!!!! Do not forget the finger hole. We have it in sizes of 5 P.
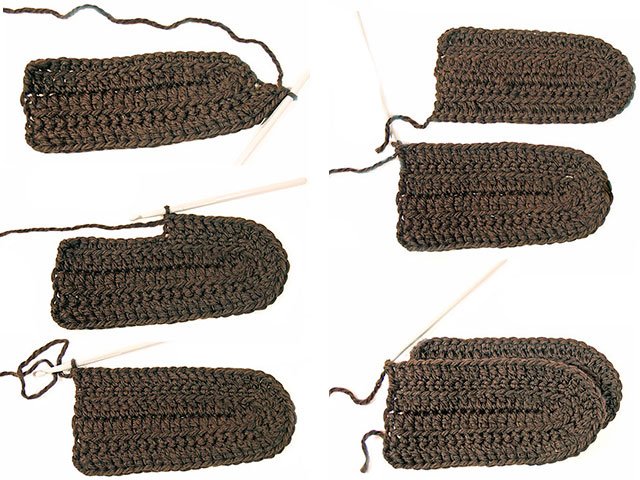
For cuff: 1 R.S.B.N., 2 R.s .: S.S.N., 3 R.s .: lush ST., 4 R.s .: “Crab step”.
To tie a slot for a finger In ext. side: WB 1 P., in: P.R. And so in each new R. 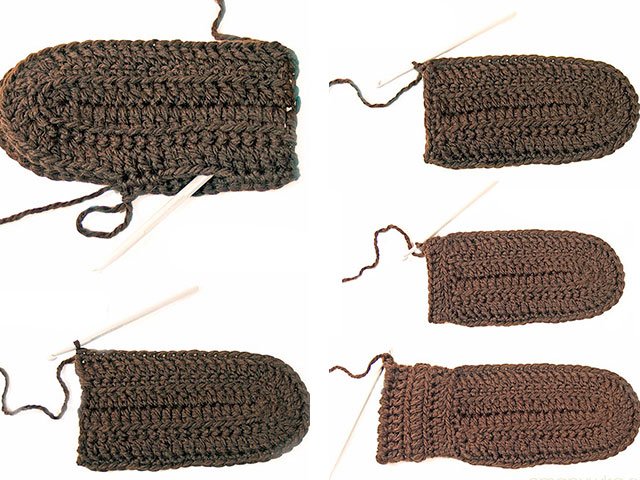 So, after you have reached the desired length - fasten and cut the thread. As shown in the photo below: you can sew a long chain from V.P. so that the mittens are not lost. This is especially good for young children.
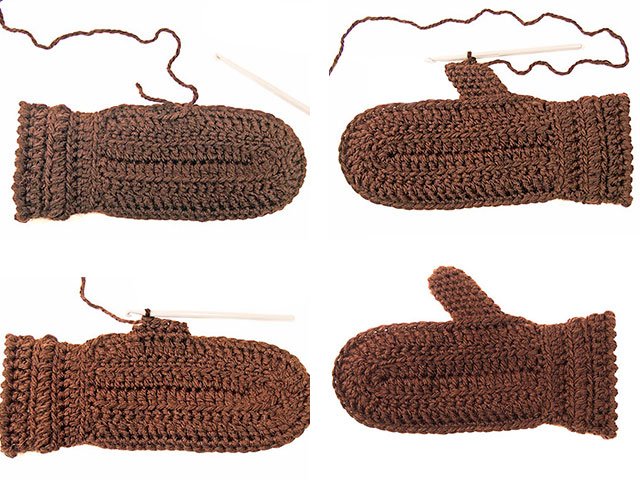
Another one a simple version of milk-colored mittens with embroidered flowers.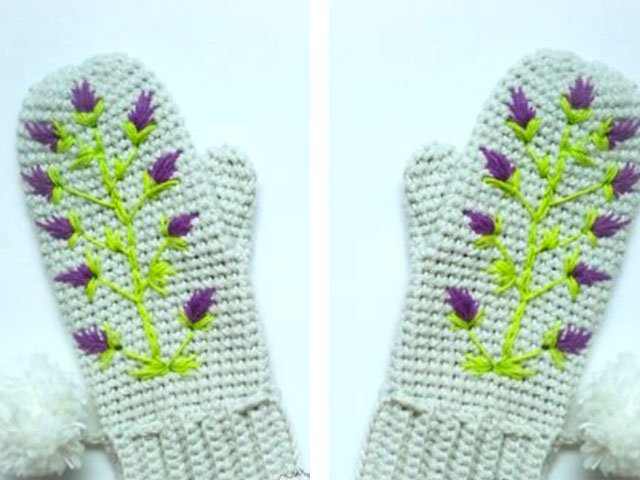 This is an optional add-on; you can skip it.So, let's start the gum, where its length is its height. First, type the chain from V.P. In each R., we first recruit V.P.P., knit for the back wall. The length of the elastic is the circumference of your wrist. When she’s ready to sew her into a ring.
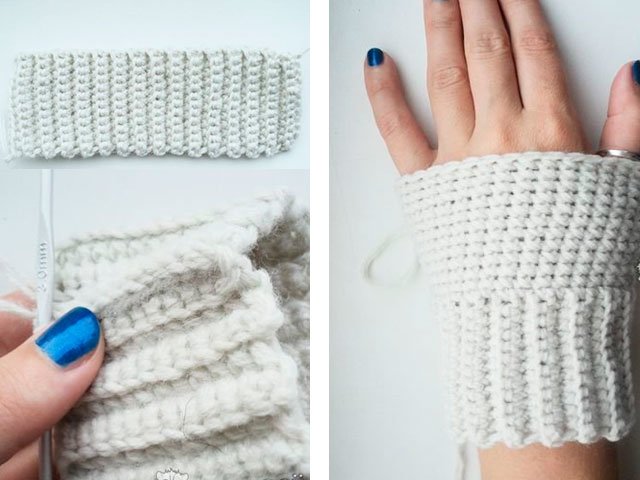 We continue knitting for the entire P. to the thumb. If the arm is much thicker - it is necessary to make P.R. symmetrically. To make a hole for a finger 7 V.P., skip 7 ST. and continue K.R.
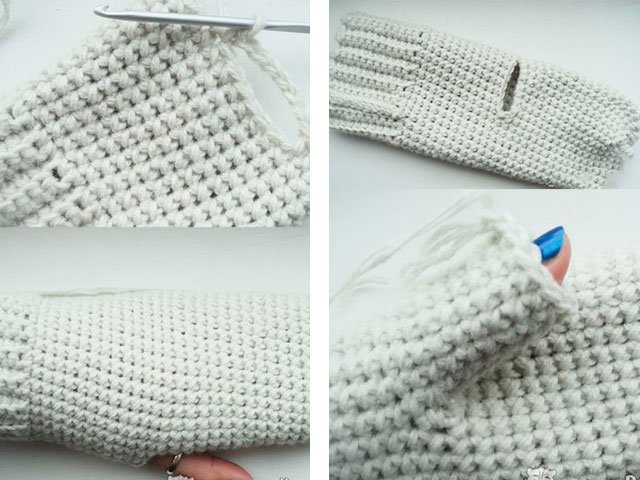 Before the start of the nails we knit, then we stop and proceed to U.B. in each 3 P., then in each 2, pull everything. We tie the finger in a circle to S.B.N. to the nail, and then again proceed to WB in each 2 P., in a trace. R. - in all P. We embroider according to the picture in the photo below.
How to crochet mittens for beginners videos
How to make children's mitts crochet video tutorial:
Crochet mittens for newborns
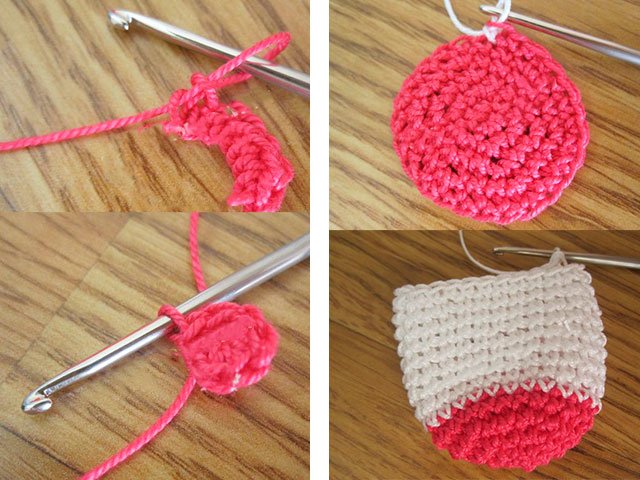
Such mittens are needed not just to save from the cold, but so that your baby can sleep peacefully and not touch his fingers in his sleep. We chose cotton yarn with a fine composition, a hook of 1.9, and a satin ribbon.
Work description:
- Amigurumi ring of 6 S.B.N. tighten as tight as possible.
- 1 R.: P.R. * 6
- 2 R.: (S.B.N., P.R.) * 6
- 3 R.: (2 S.B.N., P.R.) * 6
On this knit pink shade finish. We turn to the white color: 9 R.S.B.N. Again we change the thread: 1 R.S.B.N. Into the ice. R .: 2 P.P., S.S.N., V.P., S.B.N. through 1 P. * to the end of R. We close this whole thing S.P.  We beautifully complete the perimeter of the future mitten: in 2 P. 5 S.S.N., S. B.N., in 2 P. 5 S.S.N. - to end. Now a satin ribbon is useful, which you need to thread through the holes and tighten like a bag. Tie a beautiful bow and you're done !!!!
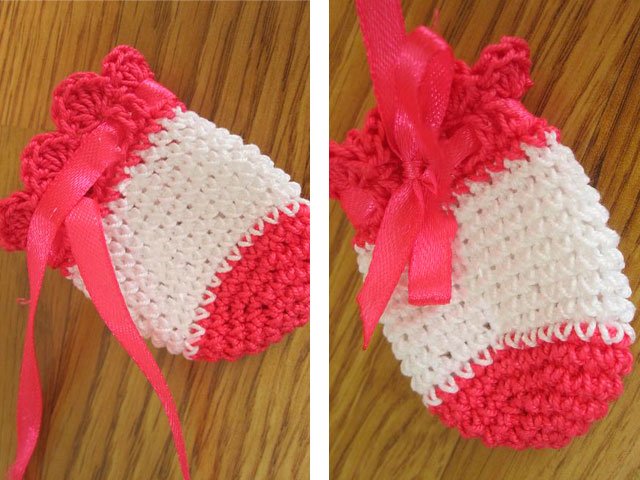
Crocheted mittens for men
Beautiful men's mittens are a great gift for your husband, brother or young man. We took wool yarn, because it is the best material for winter cold, which will provide your hands with good protection against cold.
Will need a man’s hand about 175 grams of gray (primary color) and several grams of black (or any other of your choice). We will do the work with a hook that matches the thickness of the selected thread.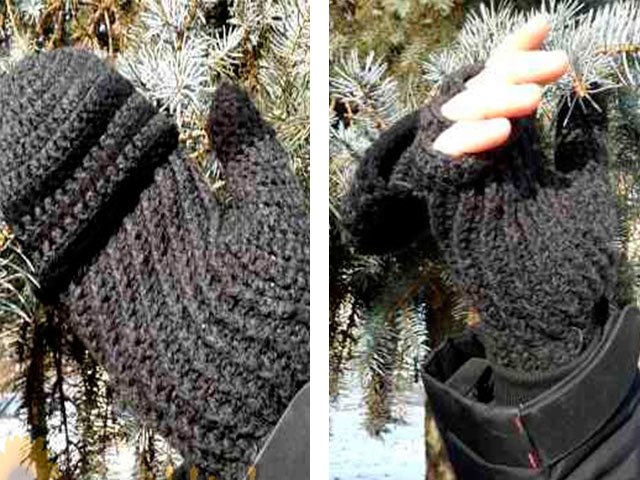
We start them knit in a circle (from the first 34 V.P.). The ring should be of such a size that it is freely put on the wrist and is also freely removed. Thus, you need to calculate the desired number of V.P. 1 R.: 34 S.S.N. Second R. and all subsequent: 1 S.S.N. convex, 1 S.S.N. concave / convex. Knit this way to the thumb. After this step - the coup of the canvas, the dressing in the opposite direction. This is done in order to get a smooth and beautiful hole for the finger. Then again we continue to knit as before. When your product reaches such a size that it reaches the wrist: 2 R.S.B.N.
Thumb on a mitt: tie a hole for it along the edge 1 R.S.N. Last R .: 12 S.S.N., 6 S.S.N.
As you have already noticed, we have succeeded beautiful mittens. You can leave it like that, or you can tie the top. For this, 1 R.: 6 S. B.N., 12, 18, 24.3 °. Next 36 S.S.N. From 2 to 6 R. From 7 to 11: 36 S.S.N. in each R. The top can be sewn, or attached using a button.
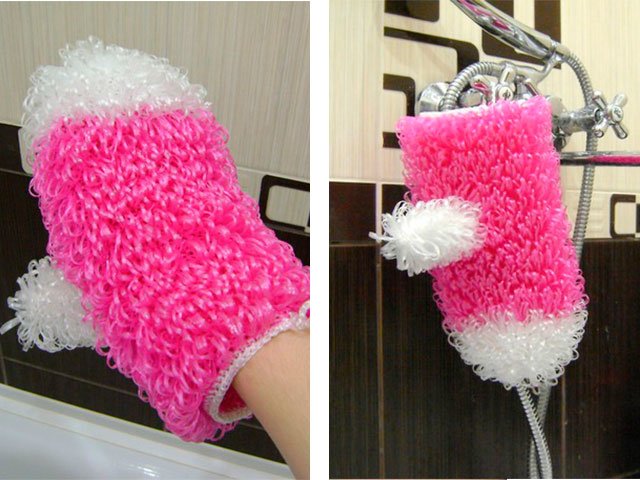
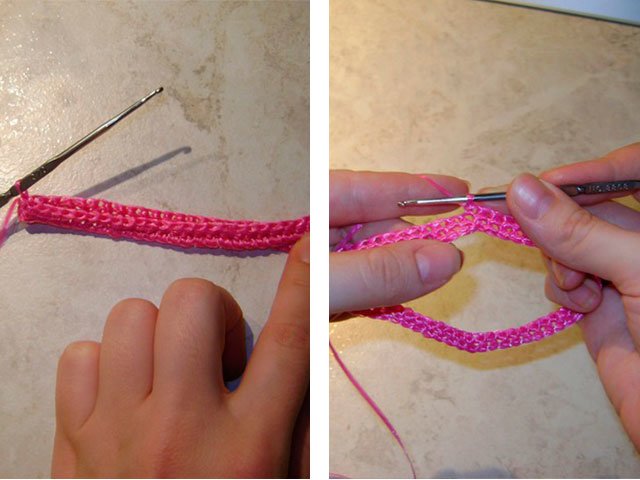
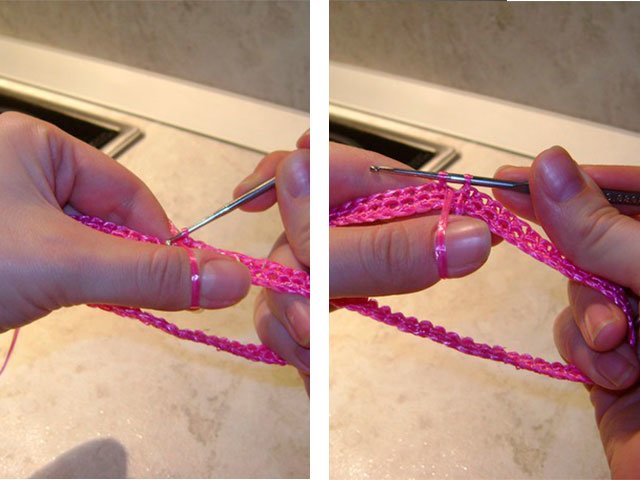
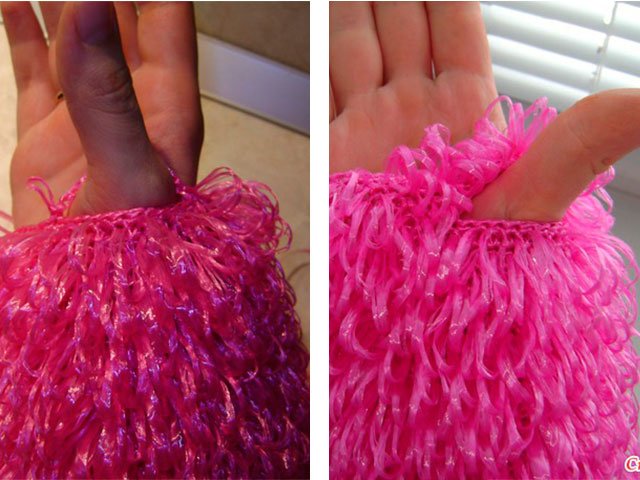
How to crochet a washcloth mitt with elongated loops
So we took pink and white polypropylene threads and appropriate sized hook. A simple pattern will alternate here: 1 R .: S.B.N., 2 R .: V.P. (elongated loops).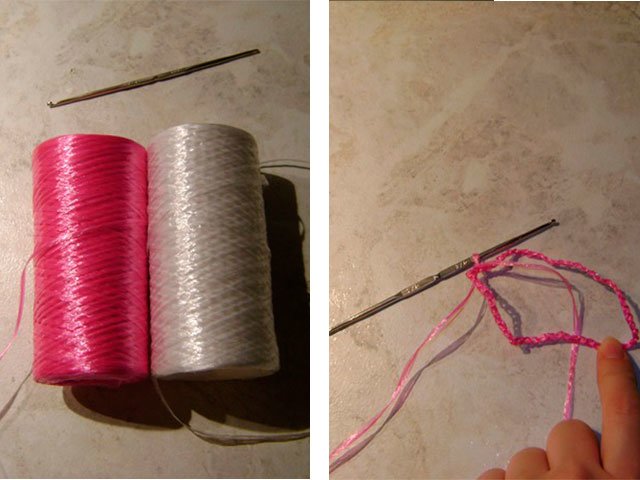
 We collect a chain of 56 P. into the ring.
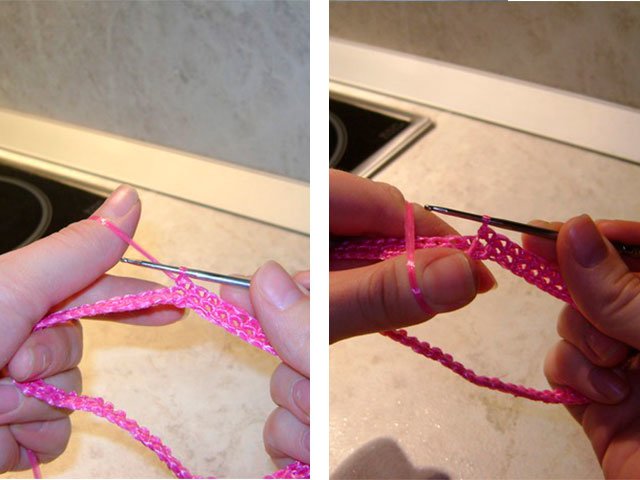
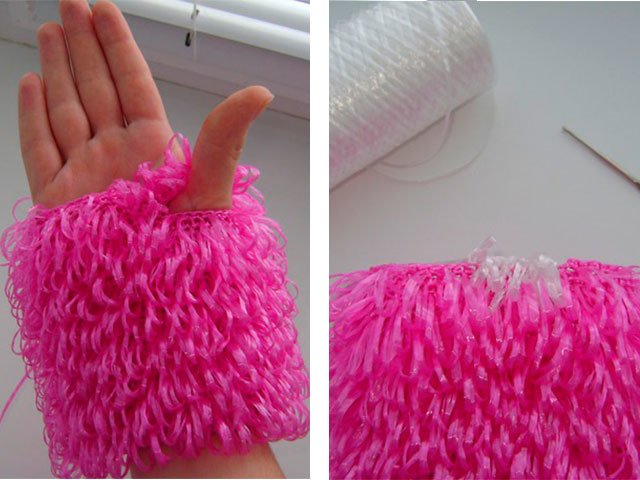
 2 R.S.B.N., one row V.P., a row S.B.N., R.V.P. - to the thumb. Make a hole: skip 12 P., 12 V.P.
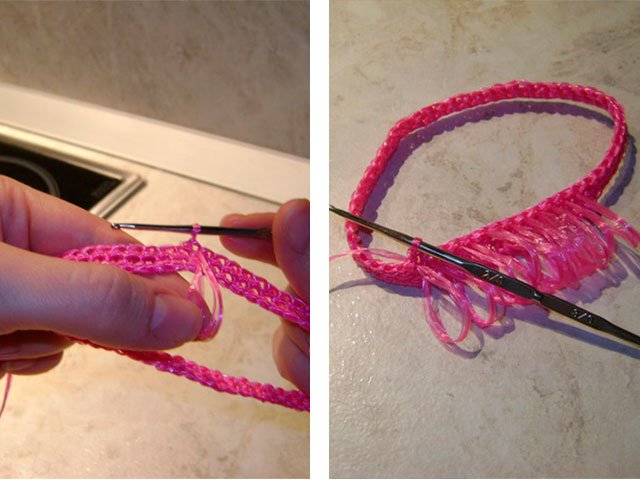
 We continue knitting to the upper edge of the little finger.
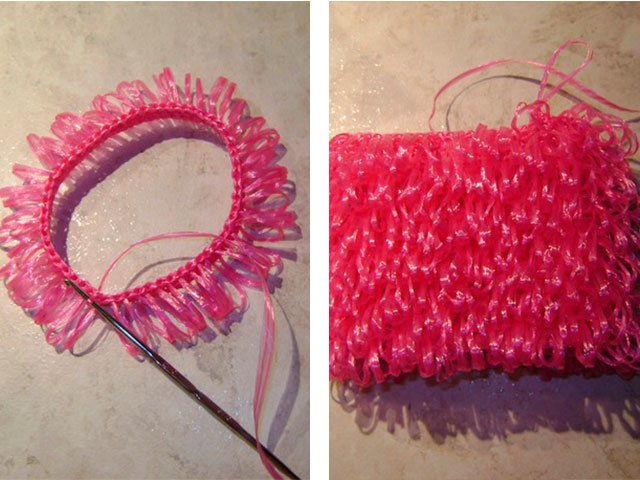
 We pass on white. We start U.B. before closing all P.
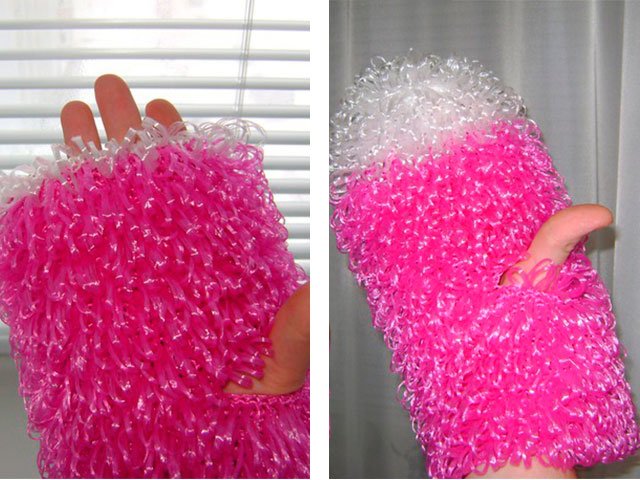
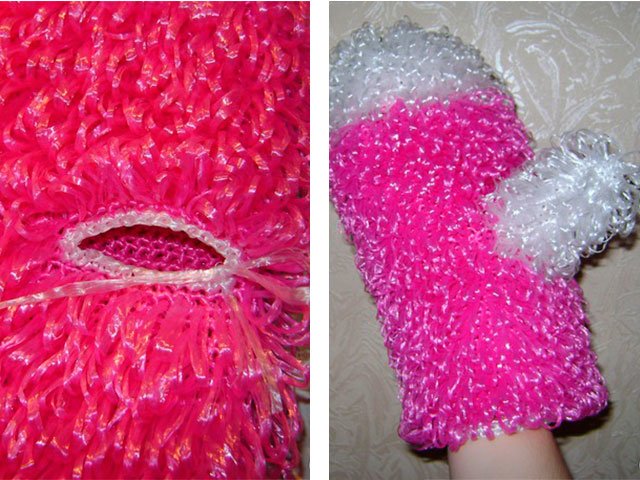
 Thumb - 1 R.S.B.N., 2 R.: V.P. Tie along the bottom edge of the S.B.N., not forgetting to do eyelet for hanging using white color.