
Better than a beautiful tie can only be a properly tied tie. Even the most elegant and successfully combined with a suit by the color and pattern of a tie can be unkemptly tied so that it spoils the whole image. To avoid this situation, you need to learn how to tie a tie. This is not the most difficult art and you can learn it quickly by following the step-by-step instructions.
Basic Rules

Tie ties, as well as wearing them, have their own immutable rules. In order to look solid and not cause others to feel that something is wrong with him, a man should consider not only technology, but also tie rules.
- The knot should not be tight, but the tie should also not hang. Many men do not like to wear ties because of the sensation of a noose around their neck. To do this, it is worth relaxing the knot a bit and after a while you will get rid of the feeling of discomfort.
- The tie is not tied on a jumper or t-shirt, only on the shirt collar.
- It is recommended to tie the knots not on the neck, but in the hands, on the neck the tie is only tightened.
- The wide end of the tie should not be higher or lower than two centimeters from the waist. To do this, stretch the tie under the collar so that the narrow end hangs down to half the length of the wide.
- To make the knot harmonious, it is necessary to take into account the width, fabric and texture of the tie. A huge number of ways to tie a tie are thought up taking into account the fact that not every knot will fit ties of different fabrics, of different widths and different degrees of slipping of the fabric. So, the most universal knot for any type of tie is considered to be a “four-in-hand”, knitted, woolen and tight ties should be tied with “Kent”, and narrow and flat with “Victoria” or “Prince Albert”.
- In addition to the appearance of the tie, you should consider the type of event that you put on the tuxedo. A simple or classic knot is perfect for daily wearing a tie in the office, but for an official event it is better to choose a more elegant knot.
Tie-up Techniques
Types of tie knots are comparable with the knowledge of Albanian - it is not used in everyday life, but if there is a chance to shine, then there are no competitors. Every man appreciates a woman who is able, with a flick of her hand, to create an impeccable tie knot on his neck ... appreciates and secretly is slightly afraid.
There are many techniques for tying a tie, but the article describes the most basic and simple for beginners to learn: a simple knot, classic, Windsor and Pratt.
Simple node: step by step instructions

This knot is the basis of the foundations, the simplest method that fathers pass from generation to generation. The easiest way is also called “four” or “four-in-hand” because it is performed in four movements.
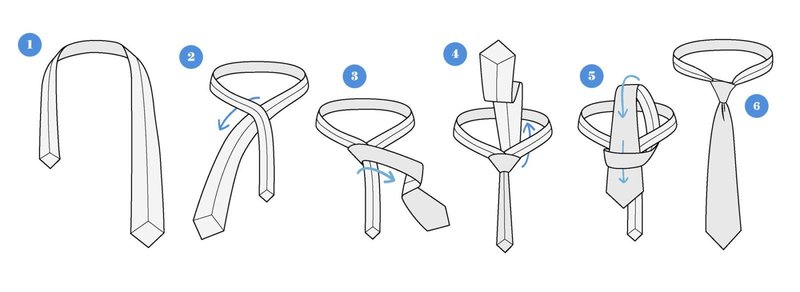
Procedure:
- Position the tie on the neck so that the wide end is on the left and the narrow end is on the right.
- Throw the wide end over the narrow one and wrap it at the bottom.
- Make a turn immediately from above.
- Bring the end of the tie in and up, straighten and push it down.
- Adjust and tighten.
Done!
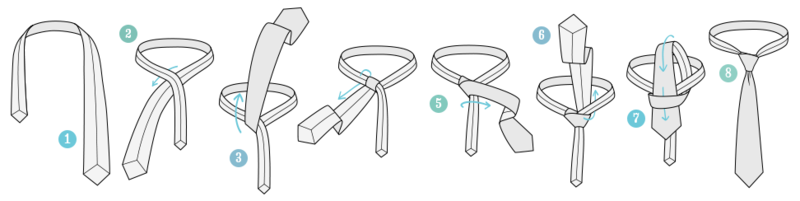
Easy classic knot: step by step instructions

The lightest of the classic nodes is called the "semi-windsor". This is the first step towards truly sophisticated tie knots. A tie tied in this way is perfectly worn in everyday life, but arouses respect in society: a light classic with a twist.
It is tied like this:
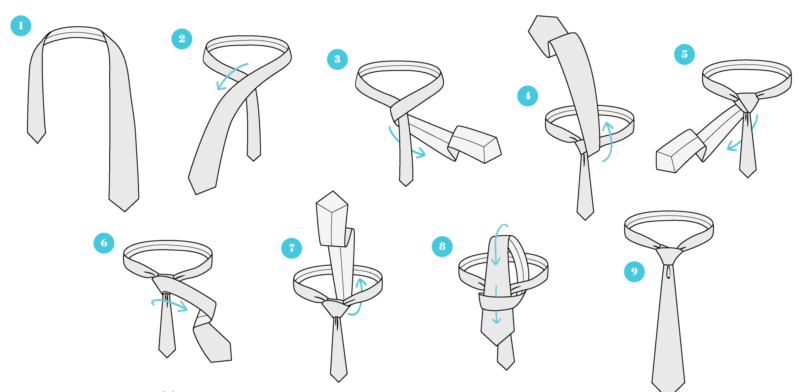
- Position the tie around your neck so that the wide end hangs below the narrow one.
- Throw the wide end over the narrow one.
- Spend the wide end under the narrow one.
- Insert the wide part of the overlap in the neck loop.
- Pull down and to the right.
- Overlap the resulting loop.
- From the bottom left, pull the wide end inward into the neck loop.
- Insert the wide end into the formed pocket.
- Tighten the tie at the lower end.
Windsor Node
Classic Windsor - The simplest of the most complex, looking dignified and solid due to the voluminous tie loop, which is done due to several additional turns. Such a knot is perfectly obtained on ties made of thin fabric, on a dense one it will look too elaborate. In addition, it is better to tie ties of medium width to the Windsor knot: on too narrow and too wide, it will look clumsy.
Instructions for tying a tie "Windsor" knot:
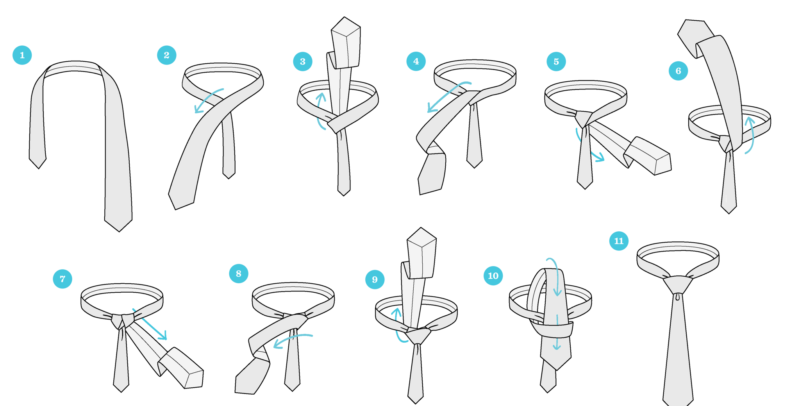
- Wrap a tie around your neck.
- Throw the wide end to the narrow one.
- Thread the wide end into the loop.
- Pull it down and to the right.
- Thread the wide end under the narrow one.
- Repeat the loop.
- Stretch the wide end down and to the left.
- Wrap them in the narrow end.
- Thread the wide end of the tie back into the neck loop.
- Insert the tie into the pocket.
- Tighten.
Pratt Node
This knot was invented by Jerry Pratt, an employee of the US Chamber of Commerce, from which the knot is also called "American". Sometimes he is called Shelby. This site is very popular in America because of its versatility and elegance, which made it popular both in office life and at social events.
The Pratt knot is tied in the following way:
- A tie is thrown around the neck with seams outward, with a wide end to the right and a narrow end to the left. The left end extends to the navel, the main movements are wide.
- Pass the wide end under the narrow one, forming a cross.
- Thread the wide end from this position under the loop of the tie on the collar.
- Wrap under the collar and pull to the left.
- Lay the wide end from left to right, forming the front of the knot.
- Thread the wide end back into the collar loop.
- Thread the wide end into the pocket.
- Tighten the tie.
Thus, tying ties is nothing complicated. The main movements are simple and vary among themselves by the number of revolutions. With these simple instructions, you can easily learn to tie a tie with the most classic knots.


Thank you very much for the interesting and useful tips. It turned out to tie a wedding tie just with a bang. The husband is satisfied. And premieres to others.